Preserving legacy code with Software Heritage: A tutorial

This post will walk you through the Software Heritage Acquisition Process (SWHAP), a step-by-step method for properly archiving your legacy source code into the Software Heritage Archive. You can also follow along with the 32-minute YouTube video or use the guide on GitHub prepared by team member Mathilde Fichen. If you’re looking for more help, check out the SWHAP guide or join our mailing list to share information with other rescue and curation teams.
Setting up your local working environment
Let’s get your local workspace set up. First, you’ll use a GitHub template to create a new repository, then clone it to your computer. This creates a local copy, making it easy to manage your files.
Start by creating your own GitHub repository using the provided template. Name it after your software, adding “workbench” to the end (e.g., “my software workbench”) and indicate that it’s a private, temporary workspace. After you create it, you can update the README with details about your software.
Now, let’s create a local copy of this environment. Click the “code” button, copy the SSH link, and then use the git clone command in your Linux terminal to clone the repository to your computer.
Uploading raw material
Once your local workbench is set up, the next crucial step is to upload all your initial materials into the raw materials folder. This includes your original source code material, such as scanned paper listings, compressed files, or any initial digital versions. It’s also vital to upload any relevant documentation that explains the source of the code, such as emails from the historical author, provided the author consents.
Next, you’ll upload the machine-readable version of your source code into the source code folder. If your code is in a non-digital format (like on paper), you’ll need to transcribe it first.
For better organization, especially if your software has multiple files, it’s a good idea to create subfolders. Just be sure to use the correct file extensions for your programming language (e.g., .for for Fortran or .py for Python).
To wrap things up, you’ll need to fill out the metadata folder. This folder contains several important elements that you should complete as thoroughly as possible:
- Catalog: This file references the initial elements you uploaded into the
raw materialsfolder. You should include details like the item’s name (e.g., “listing from 1971”), its origin (e.g., “author’s personal archives”), where the original is stored, the author’s name, approximate dates, and who collected it, along with any relevant descriptions or notes. - License: If you know the software’s license, fill it in. For private code that you own, you can specify any license you wish. If there’s no license, but you have explicit permission to archive and use the code (for academic or educational purposes, for example), be sure to state that.
- Version history.csv: This CSV file is designed to register data for each version of your software. It’s useful for automating the reconstruction of your software’s development history if you have multiple versions. Remember to fill in details such as the directory where each version is stored, author names and emails, creation dates, release tags (official version numbers if available), and a commit message for each version.
- Codemeta.json: This file, in JSON format, is not meant for human reading but is crucial for search engines to easily find and identify your code and its linked data once archived. While you can update your
codemeta.jsonfile manually, we recommend using the CodeMeta generator website, which allows you to enter your software data in a user-friendly interface and then generates the necessary JSON snippet to paste into yourcodemeta.jsonfile.
Syncing with GitHub
Once you’ve added all your materials and metadata locally, the next step is to synchronize these changes with your online GitHub repository. You’ll do this using a few Git commands in your Linux terminal. Navigate to your workbench directory and use the git add, git commit, and git push commands for the raw materials, source code, and metadata folders. This ensures all your local work is backed up on your GitHub repository.
After you’ve uploaded all your initial materials locally, the next big step is to make sure everything you’ve added is synchronized with your GitHub repository online. Here’s how you do it:
First, navigate to your workbench directory using your command line. Once you’re in the workbench directory, you’ll use specific Git commands to synchronize your files.
You’ll do this in three main parts:
Raw materials:
- Add your raw materials:
git add raw materials - Commit these changes:
git commit -m "Your small message here" - Push the changes to GitHub:
git push
Source code:
- Add your source code:
git add source code - Commit these changes:
git commit -m "Your small message here" - Push the changes to GitHub:
git push
Metadata:
- Add your metadata:
git add metadata - Commit these changes:
git commit -m "Your small message here" - Push the changes to GitHub:
git push
Finally, check your GitHub repository to confirm that all your documents, like your raw materials, are visible. With that, you’ve now completed the first major step of getting your initial materials uploaded and synced to your workbench.
Reconstructing development history
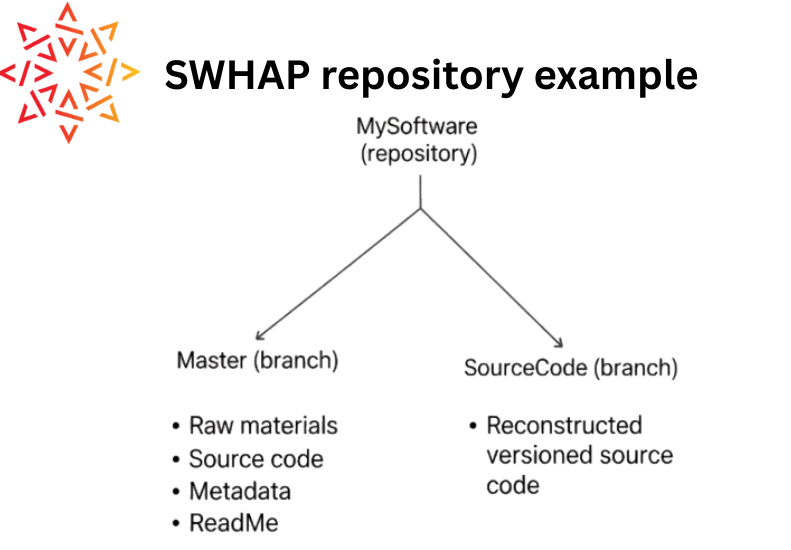
This is a crucial phase, especially if your software has multiple versions. Your goal is to rebuild the development timeline of your source code on a new, dedicated GitHub branch.
1. Create an orphan branch: From your workbench, you first create a new branch called source code. This orphan branch is completely detached and doesn’t carry any previous commit history from your master branch.
2. Clean the branch: After creating a SourceCode branch, you’ll clear out any existing files within it by running git rm -r . and then committing the change. This prepares the branch for you to add each version of your source code one by one.
3. Copy and commit versions: Next, copy paste the first version of your software’s source code into this new branch.
Copy the source contents into our branch:
git checkout master -- source_code/v1/*
mv source_code/v1/* .
rm -rf source_code
Then use the following template to manually create an individual commit/release:
export GIT_COMMITTER_DATE="YYYY-MM-DD HH:MM:SS"
export GIT_COMMITTER_NAME="Commiter Name"
export GIT_COMMITTER_EMAIL="email@address"
export GIT_AUTHOR_DATE="YYYY-MM-DD HH:MM:SS"
export GIT_AUTHOR_NAME="Author Name"
export GIT_AUTHOR_EMAIL=<email@address>"
git add -A
git commit -m "Commit Message Here"
Mind the metadata
When you import source code and commit it, Git will, by default, use your current user information and the present date. This means you would appear as both the committer and the author of the code, and the timestamp would be today’s date—not the historical date from when the code was originally created.
That’s not what we want. To get the commit history right—so it shows the code’s real origin—you have to change the commit’s metadata manually. The template in the guide allows you to explicitly set the author, committer, and dates for the commit, preserving the historical information of the source code. Finally, add a Git tag (for example, v1) to mark this as an official version.
export GIT_COMMITTER_DATE="2024-05-01 00:00:00"
export GIT_COMMITTER_NAME="Math Fichen"
export GIT_COMMITTER_EMAIL="mathfichen@monadresse.com"
export GIT_AUTHOR_DATE="1972-05-01 00:00:00"
export GIT_AUTHOR_NAME="Colmerauer et al."
export GIT_AUTHOR_EMAIL="<>"
git add -A
git commit -m "V1 of MySoftware"
4. Repeat for subsequent versions: If you have multiple versions, repeat the process. You’ll clean the repository again, copy the next version of the source code, and commit it with its respective historical metadata and a new tag (e.g., “v2”).
5. Push the branch: Finally, you’ll push this new source code branch (with its reconstructed history) to your GitHub repository.
Pro-tip: automate the process
If you have many software versions, you can automate the process of updating the commit metadata with a small script called DT2SG. That way you can use the data you entered in the version history.csv file to apply the correct historical metadata automatically.
Run the following Git commands:
dotnet ./DT2SG/DT2SG_app.dll -r mathfichen/MySoftware_Workbench/source_code/ -m mathfichen/MySoftware_Workbench/metadata/version_history.csv
Creating the final public repo
Once the development history is reconstructed in your workbench, you’re ready to create the final public repository on GitHub. This is the repository that will be shared and ultimately archived by Software Heritage.
Go to GitHub and create a new repository. Name your repository after your software and make it public so Software Heritage can harvest it.
Copy the URL of this new, public repository.
Using specific Git commands in your Linux command line, you will transfer all the work you’ve done in your private “workbench” repository into this new public repository. This essentially pushes all branches and their content (master branch with raw materials and metadata, and the source code branch with its development history) to the public repository.
As a final touch, it’s a good idea to add topics to your GitHub repository, such as software heritage, legacy code, archive, and swap. This makes the repository easier to find when people search.
Triggering software heritage archival
The last step is to trigger the Software Heritage acquisition process itself.
- Navigate to the Software Heritage “Save Code Now” page.
- Enter the URL of your final, public GitHub repository into the designated section.
- Submit the URL. Software Heritage will then process and archive your code. After a few minutes, you should be able to search for your software on the Software Heritage archive and find it archived.
- As a final touch, you can generate “badges” for your archived software. This generates a code snippet (typically Markdown) that you can copy into your public GitHub repository’s README, displaying a badge confirming your software’s successful archival in Software Heritage.
And just like that, your legacy software is preserved in the Software Heritage archive.